Just like sometimes people start out with a project and find that they need more resources, sometimes people start a project and then realize that maybe they didn't need all the resources they allocated.
This can easily happen with a website. You might start out thinking your website needs all sorts of features (calendar, shopping cart, blog, mailing list, on-board classroom, etc) only to later realize that you only really use a select few of those features you once thought you needed. If you launched your website with WordPress and now find that you don't need all those features or perhaps you started a self-hosted hobby website and now want to save some of that money, you can move your website to Blogger in order to save some money and scope creep (* see below) that can easily come with a WordPress website.
Fortunately, moving from WordPress to Blogger is a pretty simple process.
Step 1 - Set Up Your Blogger Site
Don't take your WordPress website offline just yet. First, go create your Blogger website by going to www.Blogger.com and signing in with your Google account (if you don't have one, you can create it right there.)
When you create your Blogger site, it will have an address like http://mysuperfantasticwebsite.blogspot.com. We'll change that later. But for the time being, when you choose the name ("mysuperfantasticwebsite" in the previous example,) see if you can get the name of your existing domain. For example, if your WordPress website is at http://www.TheTwelveBeers.com (it's not because that's my website,) try to make your Blogger website name "thetwelvebeers" so that your Blogger address will be http://thetwelvebeers.blogspot.com.
This last part isn't 100% necessary, but it helps keep all the names the same so that everything relates well. Especially if you start getting a lot of Blogger blogs (I have fourteen ... yeah, I know, that's a lot but I don't blog on all of them, I set up some for friends but I'm still an admin in case they need help.)
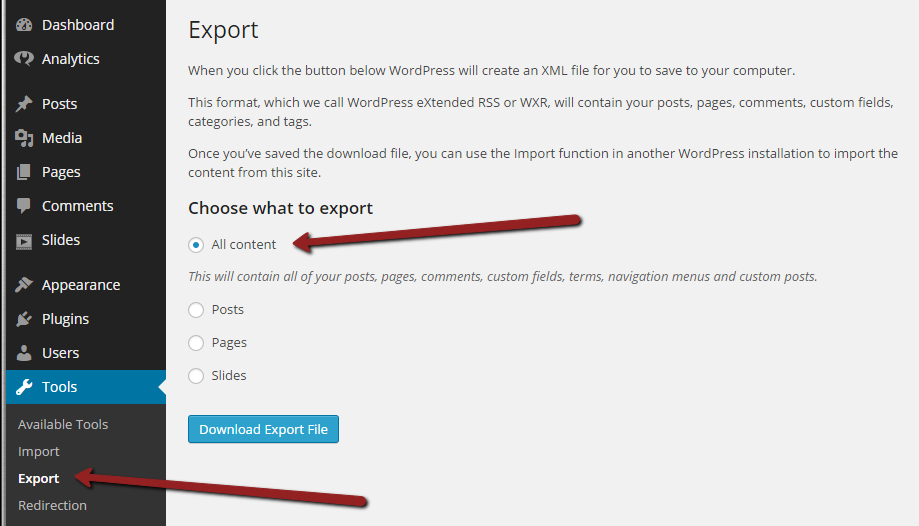
Step 2 - Export Your WordPress Blog
Click for full size image
Go into your WordPress website's dashboard and click on the Tools menu and then Export. Here you'll choose All Content and then click on the button labeled Download Export File. Once prompted, choose a location on your computer to save the XML file that the Export will produce.
Depending on the amount of content you have on your website, this could take a while. While testing, I exported this website (55 blog posts and 22 pages) and it just took ten seconds or so before the file was ready to download and save to my hard drive.
Please note that this export does not include your images. We'll get to that in a later step, but before you go too far you should know that there will likely be some work involved for you if your images are hosted by the same company that hosts your WordPress website.
Also, please note that the converter (next step) will only process about 1 megabyte of information. My export was 1.6 MB and the converter clipped off part of the information. If your file is too large, you can go go back and Export only the posts. That cut my file size down to 0.9 MB. If you have a lot of blog posts, let's say several hundred, you can break them up into several export files and then convert and import each file individually. You'll see below that Blogger merges the imported posts and does not overwrite them.
Step 3 - Convert Your XML File
Blogger only likes to read Blogger-formatted files. Of course, WordPress doesn't create those. The good news is that someone has written a converter. Go to http://wordpress2blogger.appspot.com. By the time you get there, you will have already covered steps 1 to 5 on that website. So pick up at step 6 by clicking the Choose File button and then clicking Convert.
As with the previous step, you'll be prompted to save the newly converted file to your hard drive.
Step 4 - Import Your File
Click for full size image
Alright, now get back into your Blogger blog's dashboard and go to Settings and then Other. Near the top you'll see Blog Tools and a link for Import Blog. Click that link and from the pop-up window select your converted XML file, type the captcha code, and click the Import Blog button.
If you already have blog posts on your new Blogger blog, the blog posts you import from WordPress will be merged in. So, if you have to import several batches of blog posts from your WordPress blog, you can do it without fear that you'll overwrite and lose some of the blog posts.
Step 5 - Get Your Images Moved Over
This step is optional but probably necessary. With most WordPress sites, your images are stored on the blog when you upload them and insert them into posts and pages. For example, in this post I have three images. They are stored here on my WordPress blog at
- http://www.15minutemondays.com/wp-content/uploads/2015/01/WordPressToBlogger.png
- http://www.15minutemondays.com/wp-content/uploads/2015/01/WordPressToBloggerExport.png
- http://www.15minutemondays.com/wp-content/uploads/2015/01/WordPressToBloggerImport.png
You can see that the beginning of the path to each image (www.15minutemondays.com/wp-content/uploads/2015/01/) shows that it is located directly on my website.
Unfortunately, when you move to Blogger, the export process does not export the images. Sure, when you first import into your new Blogger blog, the images will appear in the posts. But that's happening because they are still referencing the domain which is still pointing at the WordPress webhost. When you reconfigure that domain name so that it points to your Blogger blog, the links to the images at the WordPress site will be broken.
So, how do you fix this? Sadly, you have to download every single image and then re-upload it to your Blogger blog and replace the image in the post. This will get super tedious if you have a lot of blog posts. The last time I did it required the moving of about 50 images. It's not hard to do, it's just tedious. So I watched a couple of hours of sitcom reruns over the top of my laptop while I moved the images.
The basic steps for Step 5 are ...
- Go to each post in your WordPress website,
- Click on each image so that you are viewing the full size image,
- Download the image to your computer,
- Go to the same post on your Blogger blog,
- Delete the image that is there and replace it with the exact same image that you just downloaded from the WordPress site.
- Repeat until you're done.
See what I mean? Tedious. But also quite necessary.
It is possible, though, that you stored your images on another server (like in your Flickr or Picasa accounts.) If that's the case, you are fine. How would you know if you did that? If you don't know you did it, then you most likely did not. It would be something that you were aware of when you were doing it.
Step 6 - Change the Nameserver Settings at Your Registrar
There's just one more step. Now you need to change the nameserver settings at your registrar to point to your Blogger blog instead of your WordPress blog.
Google has a great set of instructions for doing this, so instead of me retyping them here, just follow the link below to their instructions.
Using a custom domain for your Blogger blog
The Quick Takeaway
As much as I love WordPress, I know it's not for everyone. And I also love Blogger. It's a great option for people who don't want all the bells and whistles of WordPress. There's nothing wrong with realizing that WordPress is simply more than you need and discovering the love of simplicity that Blogger brings to the table.
By Leslie March 24, 2015 - 3:33 pm
I’ve got everything moved over from my self-hosted WordPress to blogger and I’m ready to switch over my custom domain. Any existing links on the internet to my posts won’t work anymore, right? (My permalink structure in WordPress used the date in it). Also, blogger has the html extension. Can I create custom redirects in blogger to handle my old posts? Is there any other way?
Thanks!
By Tracy Thomason March 26, 2015 - 3:37 pm
Hi Leslie,
You are correct. A link on another page to an old WP post will not carry over to your Blogger site.
The good news is that you can do custom redirects in Blogger. In your Blogger dashboard menu, go to Settings->Search preferences->Custom Redirects. You can add new redirects there. I’ve only used it once in the past, but I just set up a quick test and confirmed that it does work.
If you need help, please let me know.
Thanks!
Tracy