Many people start their first blog with the awesome and free blogging engine Blogger. As time goes by, however, many bloggers find they need extra control and flexibility that Blogger does not provide. Especially those looking to monetize their blogs. For many of these people, and since you're reading this article you're probably one of them, the next logical step in your blogging career is to move to self-hosted WordPress.
Of course, if you've spent much time on Blogger and marketed your posts using social media and such, moving your website could possibly unravel all of your time consuming marketing work. So we'll work to preserve the benefits of your social media marketing efforts by taking a little extra time. If you haven't been blogging long or simply don't care about preserving any old links that might be out on social media (I get it, sometimes you just need a fresh start,) you'll be able to skip some of those steps. I'll let you know which ones to skip as we move through the steps.
A quick note before we start: I am excited for you. I love, love, love WordPress. Don't get me wrong, I'm also a huge fan of Blogger - I still have five Blogger blogs including my annual Twelve Beers of Christmas beer review at http://www.TheTwelveBeers.com. I just love how WordPress is sooo flexible and sooo powerful and sooo inexpensive.
Why You Might Not Want to Make the Move
OK, for some people the move might not be worth it. If you do not have your own domain (ie, your Blogger website has an address of something like http://yourblogname.blogspot,com,) and you're not planning on getting your own domain (ie, your new WordPress website will have an address of something like http://yourblogname.wordpress.org,) you might not want to mess with even moving. I mean, sure, WordPress is great and all, but do you really need to deal with the hassle? Without your own domain, I'm guessing your website is probably more of a hobby site and you're looking at a fair amount of work to make this happen.
It might still be worth it to you, and that's fine. If that's the case, ignore Step 1 and get yourself a WordPress account at www.WordPress.org. Just be aware that the WordPress installations at www.WordPress.org are much more limited than the self-hosted ones at GoDaddy, Bluehost, Host Gator, and the like.
Step 1 - Get a Self-Hosted Site
Using the website hosting provider of your choice (I like GoDaddy [affiliate link] and Bluehost, but there are a lot of good options out there,) get your new WordPress website all set up and ready. You can either go ahead and fully style your website before importing your blog posts or you can import your blog posts first and style it later. The choice is yours. For me, I'd probably import my blog posts first.
Step 2 - Import Your Blogger Blog Posts
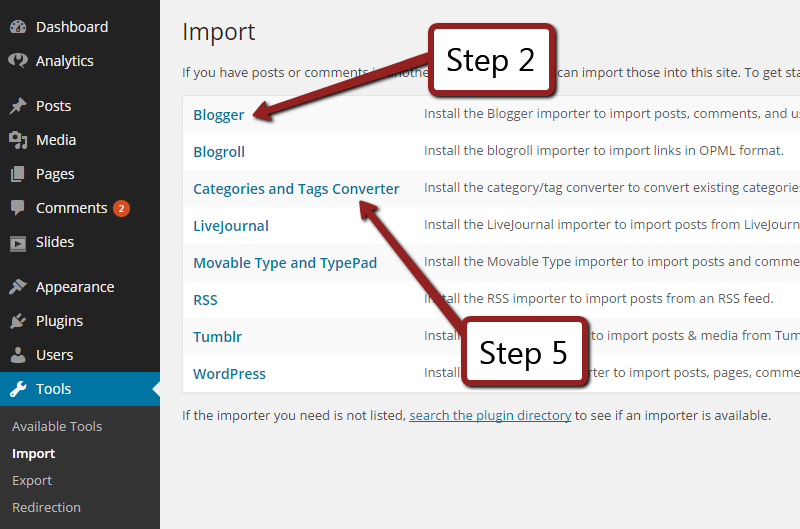
Click for larger image
Before you get too excited, this probably is not your last step. It won't take too much longer, but there are a few more steps - some optional - that you'll want to take.
From your WordPress dashboard, click on the Tools menu and then Import. On the Import page, you'll see an option for Blogger. Click on it. From here, you will be asked to install the Blogger Importer plugin. It's similar to the other plugins you've probably installed (or will install.) The only difference is that you'll probably just use it this one time and you can uninstall it later.
Once installed, click the Activate Plugin & Run Importer link.
From here, you'll go through a short series of steps where you will simply grant permission for this to take place. The process has changed a few times since I last did it, but basically you have to tell WordPress "yes, I want to import from Blogger" and you have to tell Blogger (aka, Google) that yes, you want to allow WordPress to read your Blogger account. If you're not already logged into your Google account when you begin this process, you will be prompted to do so.
After granting permission, you'll be back in your WordPress dashboard viewing a list of all of your Blogger blog posts. You'll need to click the Import button for each post you want to import.
After each post that you want to import has been imported, click the Set Authors button (where the Import button used to be) and select an appropriate author for each blog post.
Murphy's Law Disclaimer: We all know that with computers, sometimes things go horribly awry. I have never had a problem with this tool, but the Blogger Importer plugin page has a FAQ full of solutions to possible problems. If you run into problems, check it out here: http://wordpress.org/plugins/blogger-importer/faq/.
Step 3 - Make Your Permalinks Compatible with Blogger
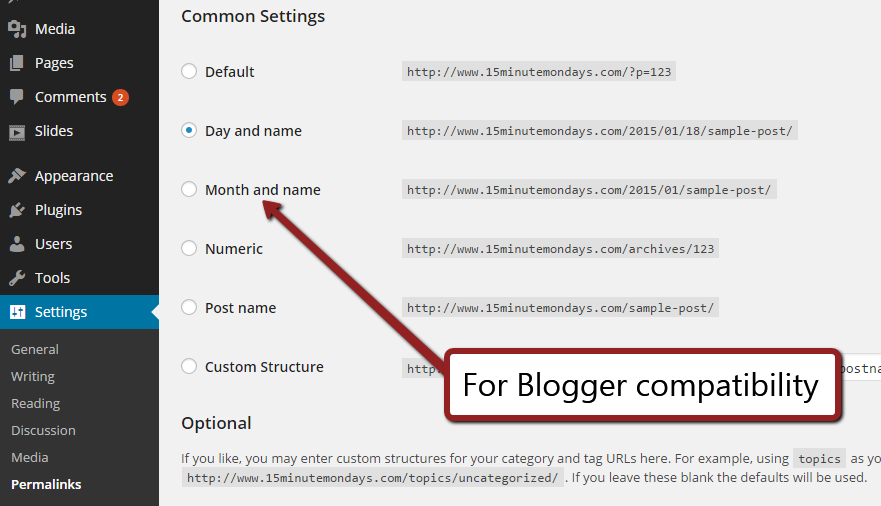
Click for larger image
This is one of those optional steps. If you haven't posted much in your Blogger account or haven't done a lot of social media marketing, you might not want to go through this step. However, if you have shared the links to your Blogger blog posts, this might be worth the trouble (and it's really not much trouble.)
The problem you're about to fix is that Blogger and WordPress use different permalinks (the website address given to each individual blog post) by default. If you've shared your Blogger posts a lot and someone tries to click on one of those old links, say from your Facebook or Twitter account, they will end up with a broken link that doesn't take them to the blog post at your new WordPress website.
To fix this, we can make WordPress use Blogger's post format. From the Dashboard, go to the Settings menu and then choose Permalinks. Select the "Month and name" option. This should fix most of your blog posts so that they have the same address that they did before. But be warned that this might not fix all the problems. Especially if you're switching from not using a domain at Blogger (eg, "http://myexampleblog.blogspot.com") to having a self-hosted WordPress blog with a domain (eg, "http://www.myexampleblog.com".)
There are other ways to ensure that your visitors are correctly redirected, but these take a little bit of programming and are a fair amount more complicated. If you think you need these, leave me a comment or email me and I'll get you pointed in the right direction. For most Blogger users switching to WordPress, these other steps are just overkill
Step 4 - Redirect Your Feeds
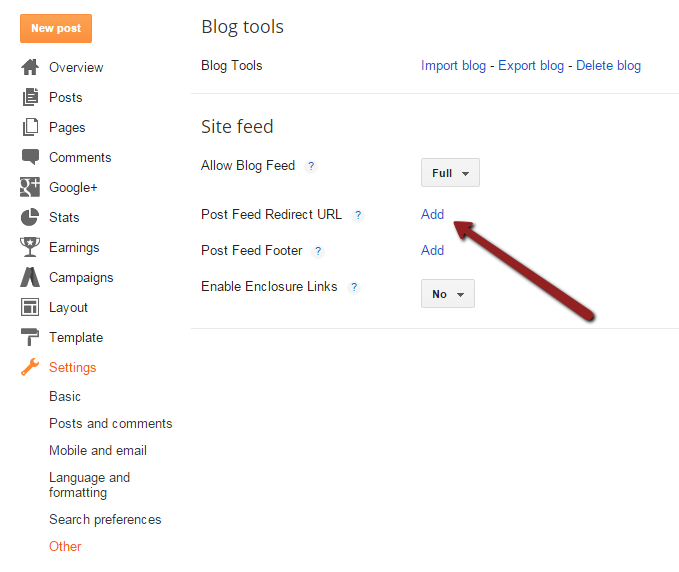
Click for larger image
Again, this is optional. But it's also simple.
If any of your Blogger blog readers use your feed (a service that allows blog reader applications to read and display your blog outside of a browser window,) when you move to your new website that feed will be broken. This is especially true for the myexampleblog.blogspot.com to www.myexampleblog.com situations.
It's easy enough to fix, though. Just go into your Blogger blog's dashboard, click on the Settings menu and then chose Other. You'll see an option for Post Feed Redirect URL. Click the Add link and put in the new feed for your WordPress blog. Normally that will be www.myexampleblog.com/feed. If you don't find it there, check out this helpful article at WordPress.org: http://codex.wordpress.org/WordPress_Feeds.
Step 5 - Clean Up Your Categories
WordPress differentiates between Tags and Categories. For Blogger, though, they are one in the same. During the import process, all Blogger "labels" are brought into your new WordPress blog as Categories. To keep from having waaaaay too many Categories, go back to the Tools >> Import page and install the Categories and Tags Converter. It's another plugin that will help you make quick work of cleaning up your Categories.
The Quick Takeaway
Blogger and WordPress are both great engines. Sometimes, though, Blogger users want to make the jump to WordPress for one reason or another. And that's OK. The steps above should help make the move semi-painlessly.